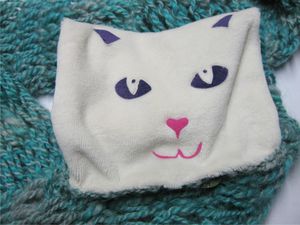
Tutoriel : le col surprise !
Voici ma recette pour le col avec doudou caché
(You will find my attempt of translation in english at the end of the post :)
Aiguilles circulaires 9.0 mm de 60cm
Une deuxième aiguille sera nécessaire pour la fermeture en graphting)
de la laine super douce (très important !)
Monter 19 mailles en montage provisoire
(ma technique préférée).
Placer un marqueur et joindre pour tricoter en rond en utilisant la technique du magic loop
R1 : tricoter à l ’endroit en enroulant votre fil deux fois autour de l’aiguille
R2 : tricoter à l ’endroit en prenant le brin arrière (torse) et en laissant tomber les jetés
Répéter ces 2 rangs jusqu’à atteindre la moitié de la longueur totale souhaitée (mon col fait 95 cm) en finissant avec un R2
Arrêter alors de tricoter en rond et faire :
R1 : tricoter à l’envers en enroulant votre fil deux fois autour de l’aiguille
R2 : tricoter à l’endroit en prenant le brin arrière (torse) et en laissant tomber les jetés
Répéter 4 fois (10 rangs, plus ou moins selon la taille de poche que vous souhaitez)
Reprenez ensuite le tricot en rond avec le magic loop
R1 : tricoter à l’endroit en enroulant votre fil deux fois autour de l’aiguille
R2 : tricoter à l’endroit en prenant le brin arrière (torse) et en laissant tomber les jetés
Répéter ces 2 rangs jusqu’à la longueur finale souhaitée (de quoi faire 2 tours mais en prévoyant juste car l'écharpe s'allonge)en terminant avec un R1
Reprendre les mailles en montage provisoire sur une autre aiguille et fermer en graphting
Rentrer les fils
Avec un crochet N°4.5 faire un rang de mailles serrées tout du long de l ’ouverture de la poche
en faisant 2 boutonnières avec 4 mailles chaînettes (cf image)
Préparer alors la poche en utilisant une matière très douce, fausse fourrure, velours de coton ou pourquoi
pas un vieux pyjama...
Couper le tissu avec des ciseaux crantés et plier le en deux avec le doux à l’intérieur
Coudre les côté
Retourner alors la poche et broder les yeux, le nez ou ce que vous voulez. Vous pouvez aussi utiliser
des transferts thermocollants comme je l ’ai fait, vous trouverez des yeux dans ma boutique en ligne, sur simple demande je peux les faire de la couleur que vous souhaitez)
Fixer la pochet à l ’intérieur de l’écharpe.
Si vous souhaitez une écharpe plus chaude, tricotez la simplement en jersey sans les jetés.
I don’t speak english fluently, so be kind, I do my best :)
My son, Orphée ask me a summer scarf with an hidden pocket to go to school
but lined with the same fabric then his « Doudou » (security blanket ?)
Here is my recipe !
Circular needle
9.0 mm (US #13) 60cm (24”) circular needle
(second circular needle necessary for kitchener stitch)
Really soft yarn
Provisionnal cast on 19 sts
(my favorite technique ).
Place marker and join. Knit in the round using magic loop
R1 : Knit wrapping yarn twice around needle. Pull all wraps through stitch.
R2 : Ktbl letting wrap fall off of needle
Repeat these 2 rows to half of desired length (my cowl is 95 cm) ending with R2
Then stop workin in the round :
R1 : Purl wrapping yarn twice around needle. Pull all wraps through stitch.
R2 : Ktbl letting wrap fall off of needle
Repeat 4 times (10 rows, more or less depending the size of the pocket you want)
Then back to knit in the round using magic loop
R1 : Knit wrapping yarn twice around needle. Pull all wraps through stitch.
R2 : Ktbl letting wrap fall off of needle
Repeat these 2 rows to desired length (my cowl is 95 cm) ending with R1
Kitchener stitch the last row together with the provisional cast on stitches.
Weave in all ends.
With a 4.5 mm hook (G or H), make sc all around the pocket operture
making 4 ch button holes (cf picture).
Then prepare to pocket using really soft fabric (an old pyjama or false fur, coton velvet)
Cut the fabric using pinking shears and fold it with the soft inside
Sew the sides
Then return the pocket en embroide the eyes, nose or what you want,
you can use transfer (as I did, because it is my job, you can find some eyes in my online store I can make them the colour you want, just ask me))
Sew the pocket inside the scarf then sew the buttons.
If you want to make a warmer scarf than just knit it without wrapping yarn.


/http%3A%2F%2Fstorage.canalblog.com%2F38%2F00%2F599708%2F85576858_o.jpg)
/http%3A%2F%2Fstorage.canalblog.com%2F21%2F34%2F599708%2F77557090_o.jpg)
/http%3A%2F%2Fstorage.canalblog.com%2F12%2F93%2F599708%2F73088217_o.jpg)
/http%3A%2F%2Fstorage.canalblog.com%2F53%2F23%2F599708%2F54599726_o.jpg)